ARTicles
Building your Watercolour Painting
A step-by-step guide to painting in the Realism style.
In his influential 1984 instructional book for aspiring artists, Catching Light in Your Paintings, Charles Sovek considers most western art from the late-sixteenth century onwards as falling broadly under the approaches of:
- Tonalism – using tonal values (the relative lightness or darkness) rather than lines or colours as the dominant feature of the painting;
- Impressionism – having much less regard for strong tonal-value structure and instead relying heavily on the loose application of colour (especially the juxtaposition of warm and cool colour) to indicate depth and model form; and
- Realism – can be thought of as a later amalgam of, or compromise between, the two earlier movements, incorporating the rich value schemes of tonalism together with the bright colours of impressionism.
When I set out to build a painting, it is this third approach – Realism – that I myself tend towards. This shouldn’t be confused with the genre of Photorealism, where the result is hyper-realistic and in many cases almost indistinguishable from a photograph. Realism, although it is founded on good, credible drawing and perspective, uses the tonal values and hues of the main shapes to provide the overarching, coherent impression of the subject. This overall impression is allowed to do the “heavy lifting” of how the viewer perceives the scene, without the need to resort to overwhelming, fussy detail; instead the realism is enhanced using a few stand-out highlight features.
I use the phrase to build a painting quite deliberately, because there is much work involved in designing, planning and laying the foundations that will determine the success or otherwise of the painting. Painting is not just a motor skill or an intuitive process; it usually requires some considerable thought and planning, particularly so with watercolour since the painting must be tackled in a particular order with only very limited time to work on each stage. Having a plan for the execution of the picture liberates the watercolourist from wasting that valuable time on thinking from scratch, once the paint is on the brush and the water is on the paper.
In this ARTicle I describe the step-by-step process I use to paint in the Realism style and I illustrate this with a watercolour painting of a windmill I recently completed (Figure 1). These steps are well known. They are no doubt taught at Art School, though as a self-taught artist I have no direct experience of that; I have; however, found various online courses and YouTube tutorials to be particularly relevant, alongside the approach of Charles Sovek in the book I referred to earlier.

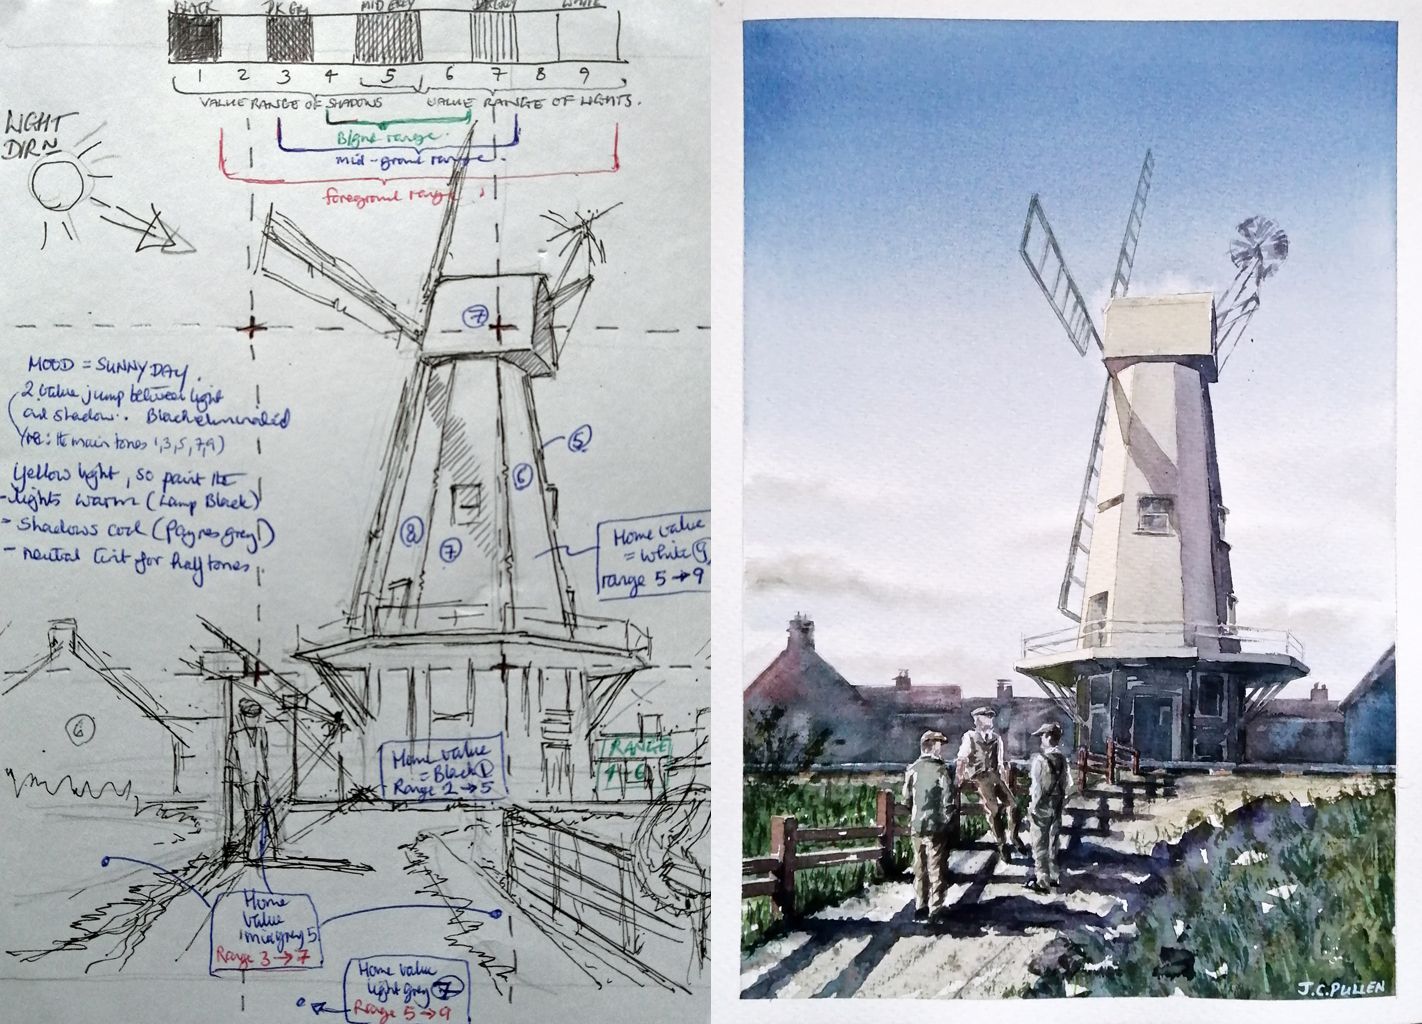
Figure 1: The finished painting - "The Windmill" a watercolour painting by Jonathan Pullen
Step 1 - Composition
To a large degree, the success of the painting hinges on this crucial first step. Establishing a suitable composition for the picture is an absolute must and if that doesn’t look broadly right, none of the subsequent stages (however competently executed) will remedy that entirely. For this reason I usually produce several simple, rough pencil sketches of alternative arrangements before settling on one composition to take forward.
Don’t copy uncritically the scene in front of you, whether that be a photograph or a real-life view; the composition may benefit from some elements of the scene being altered, added or left out. I find it helps to pay special attention to the following:
- Focal points - at this design stage, one can influence how the observer`s initial gaze is likely to travel over the picture and where you wish them to then focus their attention. Very often a particular arrangement of the main shapes and lines (especially the horizontals, verticals and diagonals) in the scene will intuitively look right to you in achieving this. You may wish to also draw on some compositional rules of thumb such as the “rule of thirds” to place some of the focal points within the arrangement.
- Simplify – at this stage, your primary consideration should be on the main shapes that make up the scene. Divide your scene into three planes of depth: the foreground, middle ground and background. The shapes in the middle ground should be less detailed and less pronounced than in the foreground and those in the background should be less detailed and less pronounced than in the middle ground.

Figure 2: Anatomy of a watercolour painting.
Figure 2 shows the initial compositional sketch I made to place the main shapes in the scene (showing divided into thirds) and showing the direction of light. It also shows annotations on the tonal values I planned to use in a later step.
Step 2 - Line
Once a suitable composition has been established, I set to work on a preparatory line drawing for the eventual watercolour painting. I tend to produce this on cartridge paper or layout paper rather than on the watercolour paper directly, as that allows for alterations and corrections to be made more easily. I then use a light box to transfer my final preparatory drawing onto my watercolour paper.
When painting using the Realism approach, there is no getting round the fact that the underlying drawing needs to be convincing and credible.
- This doesn’t mean the line drawing has to be detailed or elaborate; but it does need to capture the sizes, angles and forms of the main shapes.
- Use linear perspective to create a sense of distance and scale using straightforward drawing rules to depict: objects getting smaller and converging the further away they are; nearer objects overlapping objects behind them; and (generally speaking) nearer objects being lower down in the picture than distant objects. When these perspective rules are understood and applied properly, the realism and sense of drama is lifted to another level. My favourite reference on the subject is The Graphic Novelist`s Guide to Drawing Perspective by Dan Cooney, publ. Search Press 2019. Figure 3 shows how I established the perspective in this scene. This particular example, with an inclined ellipse for the windmill sails and a foreground fence ascending a hill, needed a rather more detailed drawing than would most scenes.

Figure 3: Establishing perspective.
Spending the time at this second stage to produce a good underlying drawing with accurate perspective is crucial: it provides a firm structure within which you are able to work looser and more impressionistically at subsequent stages without losing the scene.
Step 3 – Establishing the Tonal Values

Figure 4: Tonal tiles.
The next most important step in planning the painting involves getting the tonal values right. After all, we are able to make perfect sense of old black and white films or photographs despite absolutely no colour information being present; this is because the tonal values in those films and photos are right. In most cases though, you should not need to, or want to, replicate exactly the scene (or photo/ reference image) in front of you - your camera or smartphone could do that in an instant with far better precision! Your painting will instead be a selective interpretation of that scene, which seeks to convey the overall mood, simplify and make clear the focal points and the main, essential elements of the composition. Based on the invaluable guidance in Charles Sovek`s book, the main steps I use to achieve this using tonal values are:
- Decide on the degree of simplification you will apply to the tonal scale – at it most simple, the tonal scale could be reduced to black, mid grey and white. More often, however, I will use a five-tone scale (black, dark grey, mid grey, light grey and white), shown in Figure 4.
- Decide on the angle and direction of the light striking the objects in the scene. Then decide on the light-mood of the scene – is it to be strong sunlight, hazy sunlight, overcast or night time? The light mood determines which part of the tonal-value scale is used and how big a jump there is between areas in light and those in the shadows. For example, a scene in strong sunlight usually has a two-value jump between the lights and the shadows, i.e. white to mid-grey, and/or light-grey to dark-grey. Black is not used. On the other hand, an overcast scene would have narrower tonal range, with a single-value jump between the lights and the shadows, i.e. light-grey to mid-grey, mid-grey to dark-grey, and/or dark-grey to black. White is not used.
- Establish the “home values” of the main objects in the scene, i.e. the relative lightness or darkness of each object overall. It can be helpful to squint at the scene, or to take a photograph on one`s phone and convert it to black and white, in order to judge the home values. To give a couple of examples, when the scene has a mood of direct sunlight then an object that is moderately light would probably have a home value equivalent to light-grey, with shadows and lights on the object set at mid-grey and white, respectively. An object that is quite dark would probably have a home value of dark grey, with shadows and lights on the object set at black and mid-grey.
- In Step 1, I had already simplified the picture into three broad planes of depth: the foreground area, the middle ground and the background. A very effective sense of depth can be achieved by using different ranges of tones in these three areas:
- Foreground – the full range of tonal values may be used, depending on the home values of the objects and the type of light. For a foreground in direct sunlight this could encompass the full range from white to black.
- Middle ground – use a more limited range, with the extremes (black and white) eliminated.
- Background – use a more limited range still, anchored around mid-grey.
Look to merge big shapes of similar tonal values, particularly those where the boundary between those shapes is a “soft edge” or a “lost edge”, rather than a “hard edge” or a “firm edge”.
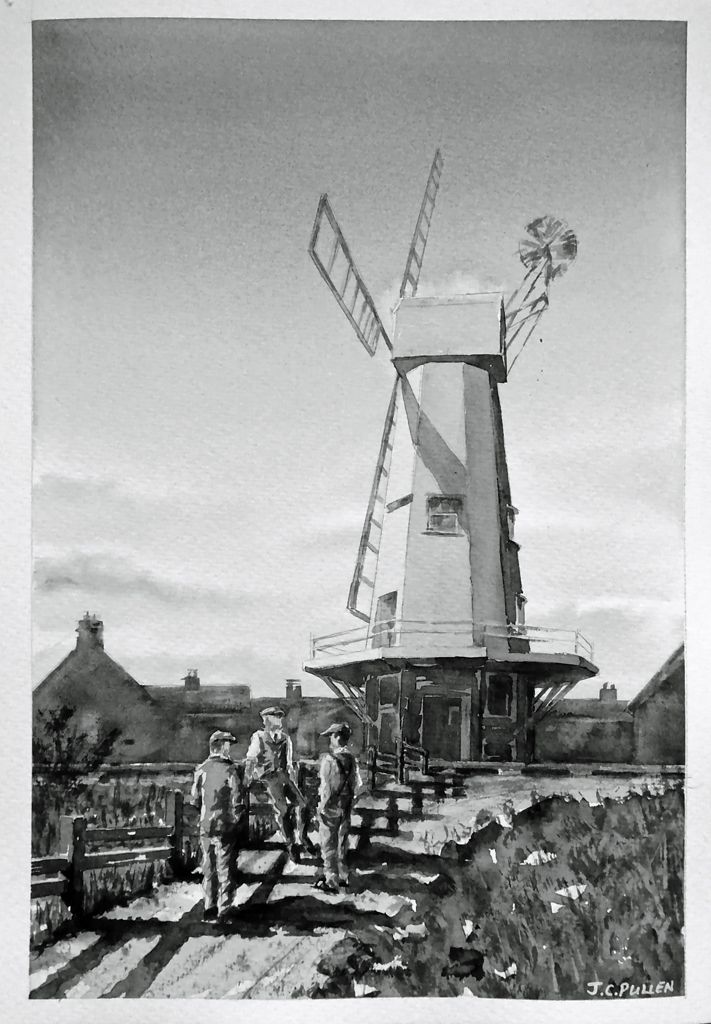
Figure 5: The tonal watercolour painting of "The Windmill" by Jonathan Pullen
At this point I tend to do a monochrome tonal version of the scene, either as a pencil or charcoal tonal sketch, or as a watercolour tonal sketch that pulls together all the preceding steps. Figure 5 shows the tonal painting I made of this scene. I excluded the figures at this stage, for simplicity and to enable me to concentrate on the main, big shapes. I should also note that I used a tonal scale with nine steps spanning black to white to enable the subtle form of the windmill, which had a quite light home value, to be modelled more precisely than if I had used five steps.
If all has gone well, and the monochrome version looks convincing, then I will progress to the colour stage.
Step 4 – Introducing Colour as the Accompaniment to Tone
We make sense of the world mainly through tonal values but we feel the world mainly through colour. Though less important than the preceding steps, colour can elevate the quality of the painting by the sense of mood and feeling it instils. I think of colour as the icing on the cake; however, this finishing touch will only work if the underlying structure of tonal values and foundation of shapes and composition have been properly put in place. It`s easy to get lost in trying to choose “the perfect” hue that matches exactly the reference, at the expense of the tonal values, resulting in the structure of the painting falling apart. Most of the time all that`s really needed is a colour that is roughly the right sort of hue for each shape or object. Provided that hue is of the correct relative lightness or darkness (i.e. tonal value), then the painting should work well enough. The primary concern at this Step 4 should, therefore, be matching whatever colours you decide to use, to the correct tonal values. Once again, the usual way to achieve this is either to squint, or to take a photograph of the colour mixes on one`s phone and convert them to black and white for easy comparison with the tonal scale.
To simplify matters, I usually limit the colours in my palette to the following: a warm and a cool version of each the primary colours red, yellow and blue; plus neutral tint* to assist with darkening (used sparingly and only where needed). These seven hues allow me to mix a wide variety of hues at different tonal values. Using a limited palette helps the colour harmony within the painting. Furthermore, I find it easier to become familiar with the mixing than if I had an extensive range of colours. Paint quality is, however, something I do not limit: I use only good-quality professional watercolours, such as those produced by A J Ludlow Colours.
As was the case when establishing the tonal values in Step 3, you should not need to, nor want to, replicate exactly the colours in the scene (or photo/ reference image) in front of you. Being selective in your use of colours can be used as a compositional tool to enhance your scene. For example:
- Colour balance - the actual, real scene may lack colour balance, for instance a group of red objects may be in one corner of the scene only. In your painting you have the opportunity to remedy that (assuming such an imbalance is not your deliberate intention) by altering the colours of some objects or areas in the scene to enhance the colour harmony of the picture as a whole.
- Colour contrast – placing colours next to each other that are opposites (or nearly opposites) on the colour wheel, can suggest vibrancy, tension and drama in that area of the painting, drawing the viewer`s gaze. You can see this on the finished, colour painting in Figure 1, where the yellowish sunlit face of the windmill contrasts with the violet-tinged shadow cast by the sail.
The ability to mix hues from warm or cool versions of the primary colours is a further refinement:
- If the light-mood of your painting is a bright sunny day, then the colour of the daylight will have a hint of yellow. Objects facing the sun will tend to have hues mixed from warm colours, the shadows will tend to be mixed from cool colours and the halftones may be neutral. You can see this in Figure 1, where the yellowish sunlit face of the grey windmill was mixed from the warm primary colours in my palette: This warm sunlit face contrasts with the cool, violet-tinged grey of the shaded side of the windmill and the shadow cast by the sail, which were mixed from the cool primary colours in my palette.
- If, on the other hand, the light-mood of your painting is overcast, then the colour of the daylight will have a hint of grey-purple. Objects facing the light will tend to have hues mixed from cool colours and the shadows will tend to be mixed from warm colours.
- It is useful to know that a hard edge in the picture will be further emphasised if it is formed from a warm hue meeting a cool hue and this can be an effective way of drawing the observer`s gaze towards a particular part of the picture.
- Cool and warm versions of the same hue can be used to add variation to interest to objects and features in the background and middle distance that have been quite deliberately (see Step 3) painted with a narrow tonal range. You can see this on the buildings behind the windmill in Figure 1.
I tend to try out the colour combinations in a quick watercolour sketch, or several sketches each focusing on particular areas of the scene, before I commit to the full painting. This enables me to practise the most challenging elements.
Step 5 – Pulling it all Together
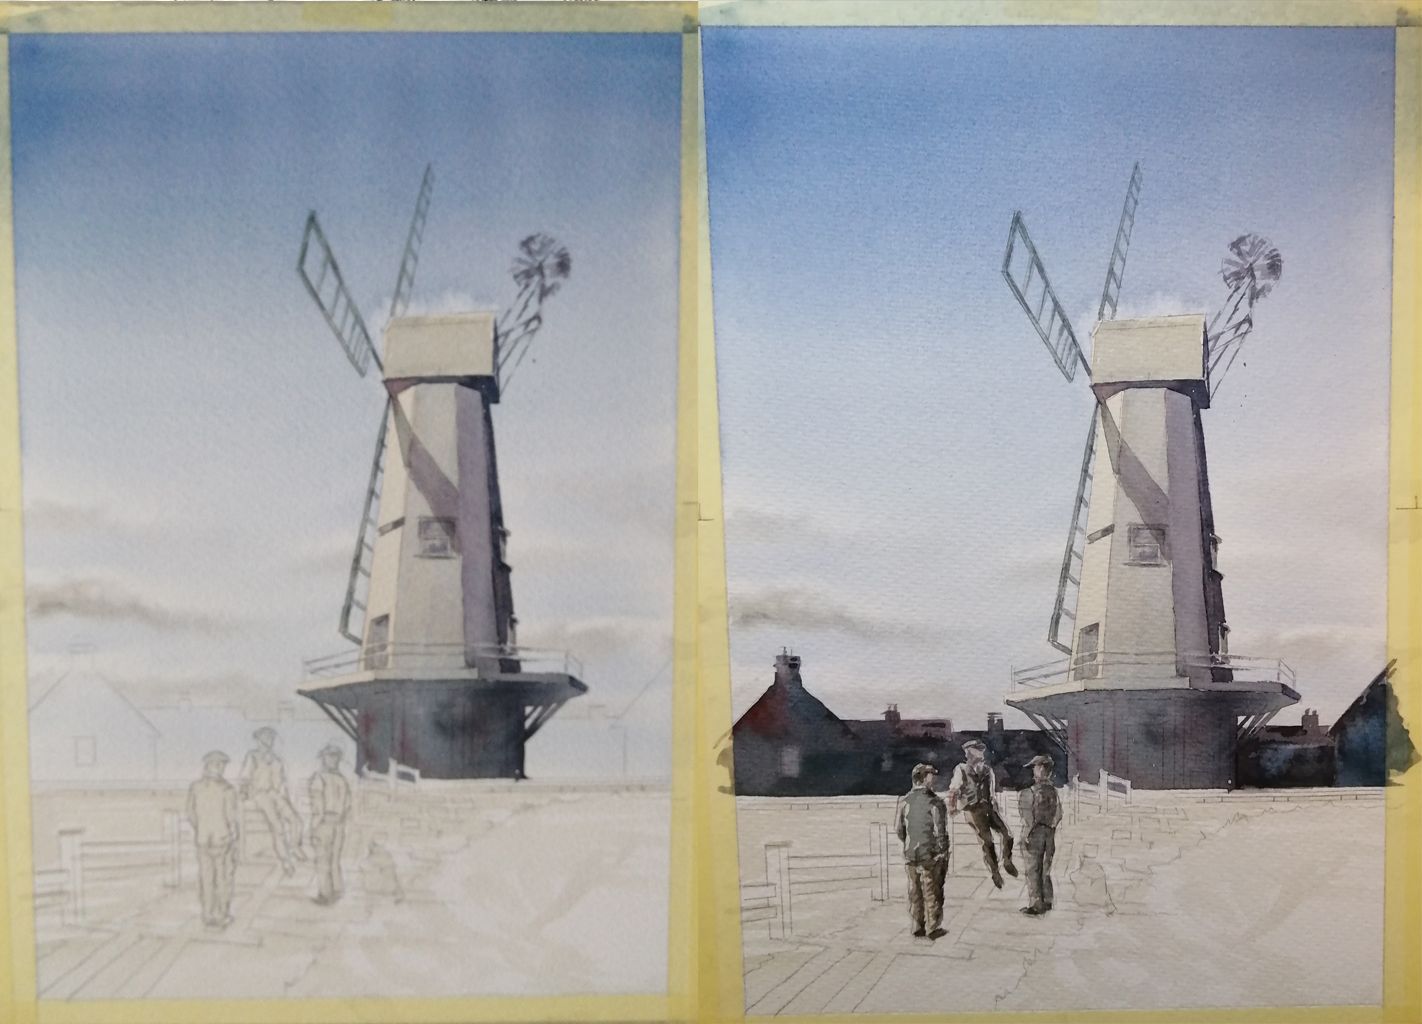
Trying to remember all the above factors can be daunting: some people seem to be able to produce apparently effortlessly a finished painting that brings all these steps together; however, I am not one of them and I need to rely on a liberally annotated sketch showing in what order I will tackle the main elements of the painting, what are the tonal values, and whether particular areas are warm or cool. Figure 6 and Figure 7 give you some idea of the order in which I progressed the windmill painting.
